
Journey of Latex
APA 的格式
APA Citation
需要使用 biber, 而不是 bibtex。在开头放:
\usepackage[style=apa,backend=biber]{biblatex}
\DeclareLanguageMapping{american}{american-apa}
\addbibresource{references.bib}
在 \end{document}之前加上 \printbibliography即可。
\maketitle error
Overleaf上的 apa模板中,要求封面有很多内容,很多情况下是我们不希望有。但是如果留空会有问题。这个时候,填入 ~即可:
\title{My title}
\shorttitle{My short title}
\author{Chixiyu}
\duedate{~}
\affiliation{} % This one can be blank idk why
\course{Computer Science}
\professor{~}
\begin{document}
\maketitle
这样不会报错。
如果删除 \professor{}这行,pdf中会出现“Your professor"占位符。如果放入 \professor{},则报错(overleaf上倒是可以这么操作)。
Table of Contents
加入代码
如果不是在 Overleaf而是在本地编译的话,可以使用 minted包,支持语法高亮。
- 需要安装依赖:
pip install Pygments
- 正文前面加入
\usepackage{minted}
\setminted{
  linenos=true,
  breaklines=true,
  fontsize=\small,
  baselinestretch=1.0
}
- 正文中写:
\begin{minted}[java] % java can be any other programming language
System.out.println("Hello World")
\end{minted}
- 如果使用的是
vscode,需要在设置的JSON里面修改编译Latex的指令,加入-shell-escape参数。这是因为minted需要使用Pygment的程序来语法高亮,Latex本身因为安全问题不会允许执行外部程序,所以要加入这一行。
具体原理是:
- LaTeX encounters code block
- Calls pygmentize (external program)
- Pygmentize processes the code
- Returns highlighted code to LaTeX‘
除了 xelatex如果使用 pdflatex也可以按照类似的方法修改(多加一样即可),本例使用的是 xelatex。
"latex-workshop.latex.tools": [
    ...,
    {
        "name": "xelatex",
        "command": "xelatex",
        "args": [
            "-shell-escape",
            "-synctex=1",
            "-interaction=nonstopmode",
            "-file-line-error",
            "%DOC%"
        ]
    }
]
结束
在Neovim里配置Latex
要配置 vimtex,只需要在 lazyvim里安装这个插件就行了。在macos上我用的PDF reader 是skim。
关键在于如何配置反向搜索,在tex文件很大的时候这个还是挺有用的。这篇文章可能有用: link。注意,我的 lazyvim用的是 lua,所以需要把他的脚本修改成 lua:
-- lua/vimtex_server.lua (or anywhere in your config)

local function write_server_name()
  -- Choose temp dir (match Vimscript logic)
  local tmpdir
  if vim.fn.has("win32") == 1 then
    tmpdir = vim.env.TEMP or vim.fn.stdpath("cache")
  else
    tmpdir = "/tmp"
  end
  local outfile = tmpdir .. "/vimtexserver.txt"

  -- Ensure we actually have a servername (Neovim sets this only if started with --listen or similar)
  local server = vim.v.servername
  if not server or server == "" then
    -- Start an RPC server so vim.v.servername gets populated
    -- Using a unique socket path/name under the temp dir
    local name = vim.fn.tempname()
    vim.fn.serverstart(name)
    server = vim.v.servername
  end

  -- Write the server name to file (as a one-line list of strings)
  vim.fn.writefile({ server }, outfile)
end

-- Create the autocmd: run for TeX buffers
local grp = vim.api.nvim_create_augroup("vimtex_common", { clear = true })
vim.api.nvim_create_autocmd("FileType", {
  group = grp,
  pattern = "tex",
  callback = write_server_name,
})
就可以了。以下是原文搬运(以防过期)
Source: jdhao’s post (Feb 20, 2021; updated Jan 19, 2022).** **
Since VimTeX v2.8, the hacks below may not be needed.** **
1) nvr
pip install neovim-remote
Test:
nvr --servername server_address -c "echo 'hello'"
--servername should be v:servername of the running Neovim.
2) Write Neovim server name to a temp file
Add to your Neovim config:
function! s:write_server_name() abort
  let nvim_server_file = (has('win32') ? $TEMP : '/tmp') . '/vimtexserver.txt'
  call writefile([v:servername], nvim_server_file)
endfunction

augroup vimtex_common
  autocmd!
  autocmd FileType tex call s:write_server_name()
augroup END
This records v:servername on opening a TeX buffer.** **
3) Configure your PDF viewer
Skim (macOS)
- Preset: Custom
- Command: nvr
- Arguments:
--servername `cat /tmp/vimtexserver.txt` +"%line" "%file"
Trigger inverse search with Shift+Cmd+Click.** **
SumatraPDF (Windows)
- Options → Set inverse search command-line:
cmd /c for /F %i in ('type C:\Users\ADMINI~1\AppData\Local\Temp\vimtexserver.txt') do nvr --servername %i -c "normal! zzzv" +"%l" "%f"
- %f = source path
- %l = line
- cmd /c avoids an error dialog.
Double-click in PDF to jump in Neovim.
Update Oct 6 2025
反向搜索有的时候不工作, 我看了一下发现 skim会每次点击的时候修改 /tmp/vimtexserver.sh 不知道什么原因,会在server地址后面加行号,像这样
/var/folders/1h/p2yz61td72vc57966wjf896c0000gn/T/nvim.chixiyu/4BTNeu/nvim.83961.0+182+182+182
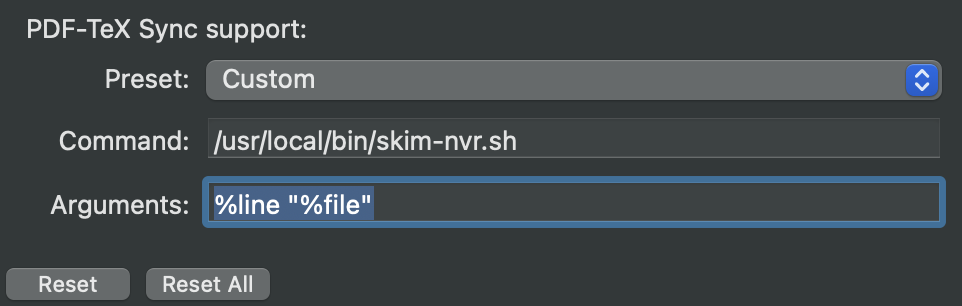
更加稳妥的方案是设置一个 bash脚本然后让 skim运行这个。以下是脚本,放在 /usr/local/bin/skim-nvr.sh 里面:
#!/bin/sh
# Wrapper for Skim to talk to Neovim via nvr

# Read only first line and strip unwanted junk (if ever corrupted)
server="$(head -n1 /tmp/vimtexserver.txt | sed 's/+.*$//')"

# If server missing, show macOS notification and exit
if [ -z "$server" ]; then
    osascript -e 'display notification "No vimtex server found" with title "Skim ↔ Neovim"'
    exit 1
fi

line="$1"
file="$2"

# Call Neovim Remote
exec /opt/homebrew/bin/nvr --servername "$server" +"$line" "$file"
回到 skim,设置command: /usr/local/bin/skim-nvr.sh,然后argument: %line "%file"。
……又是修了半天的逆天bug,无语😒